Frank!Runner Installation
Installation and start-up
The Frank!Runner allows you to easily start the Frank!Framework. In this section you will install and start the Frank!Runner. The Frank!Runner contains examples. You will study these examples to get a first impression of the Frank!Framework.
Please do the following:
Check whether you have git. You can do this by opening a command prompt and typing
git --version.If you do not have git already, download it from https://git-scm.com/downloads.
Choose some working directory in which you will install the Frank!Runner and do the exercises of the Frank!Manual, say
franks.In a command prompt, go to your
franksdirectory and clone the Frank!Runner with the following command:franks> git clone https://github.com/ibissource/frank-runner
Check your directory structure. It should look as follows:
franks
|- frank-runner
   |- ...
   |- examples
      |- Frank2Example1
         |- configurations
            |- Example1a
               |- Configuration.xml
               |- ...
            |- Example1b
               |- Configuration.xml
               |- ...
         |- tests
            |- ...
      |- ...
   |- ...
Check that you do NOT have
franks/frank-runner/build.propertiesat this point. You will study the default Frank application, which is in the directoryfranks/frank-runner/examples/Frank2Example1.Start the Frank!Runner as explained in its
README.mdfile (shown at https://github.com/ibissource/frank-runner right when you open it; you do not have to click file README.md), for example by runningfranks/frank-runner/start.bat.Warning
If you are using your computer for other development tasks, you may already have a running webserver that claims port 80. Please close that webserver or configure the Frank!Framework to use another port. Using another port is explained in the README.md file of the Frank!Runner. Your browser may have cached other stuff at http://localhost:80. Press Shift-F5 or Ctrl-F5 in your browser to see the Frank!Framework.
The main menu
Start a webbrowser and browse to http://localhost. To the left, you see the following menu:
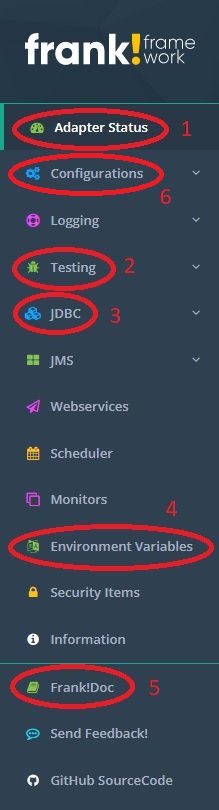
By default, you are in the “Adapter Status” page (number 1). You also see “Testing” (number 2). Please click it to expand it.
You see “Larva”, “Ladybug”, “Test Pipeline” and “Test serviceListener”. You will examine the first three of these in section Testing Pipelines.
You also have “JDBC” (number 3), which stands for “Java DataBase Connectivity”. This link can also be expanded by clicking it. Here you can find pages to manage your database.
You will soon examine the “Frank!Doc” page (number 5). Here you can find some resources that help you to write proper Frank configurations.
The “Environment Variables” page (number 4) is relevant. Here you can find many properties configured within your Frank.
Finally, you have “Configurations” (number 6). Here you can view the XML code of your configurations as explained later in this section. You can also use this option to upload configurations if you do not want to use the local file system.
General structure of the example Frank application
Let us now investigate the general structure of the Frank2Example1 application.
Look at the “Adapter Status” page. You see you really do have the
Frank2Example1Frank application (number 2 in the figure below):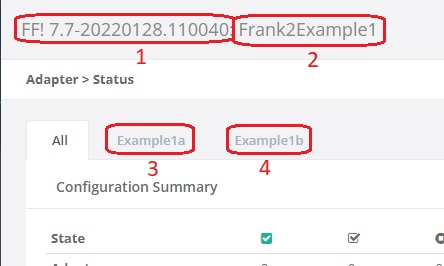
You also see which version of the Frank!Framework you are using (number 1).
You saw earlier that the directory
franks/frank-runner/examples/Frank2Example1/configurationshas two subdirectories, namelyExample1aandExample1b. These appear as tabs (number 3 and number 4). These are Frank configurations.
Frank configurations are meant to be independent of the Frank!Framework instance on which they are deployed. This situation is comparable to software packages in general, which are independent of the specific server on which they are deployed. An example of a software package is Microsoft Word. Everyone who wants this application uses the same installer, independent of the computer on which Microsoft Word is installed.
You as a Frank developer develop a Frank config, which plays the role of a software package in the above metaphor. When you are done, you hand over your Frank config to your customer. The customer has his own production instance of the Frank!Framework, which plays the role of the server. The system administrator deploys your Frank config on the production instance. He can fine-tune the behavior of your Frank config by adding additional configurations on the instance level.
Below the top part of the adapter status page that was shown at step 13, there is useful information about the statuses of your configurations. This information is discussed in chapter Operator manual. There is one button you should remember at this point; it is shown in the figure below (tooltip Full Reload). You can use it to reload your configuration after editing it. It will save you a lot of time during development work, because you do not have to restart the Frank!Runner to apply your edits.

The sources of your Frank configs
System administrators may want to check the sources of the Frank configs they see. Doing this is also relevant for Frank developers who want to debug their work. Please do the following:
In the main menu, choose “Environment Variables” (number 4 in the figure below).
In the search field, type
configurations.names. You should seeconfigurations.nameswith valueExample1a,Example1b.Note
This property and some other properties, have been set by the Frank!Runner. If you deploy your Frank config another way, you may have to care about these properties yourself.
In the search field, type
configurations.. You see some other variables that are explained below.Property
configurations.Example1a.classLoaderTypehas valueDirectoryClassLoader. This means that configuration “Example1a” comes from the file system of the computer running the Frank!Framework. Frank configurations can also be deployed on the database, resulting in a different value for this property. Propertyconfigurations.Example1b.classLoaderTypealso has valueDirectoryClassLoader, confirming that Frank config “Example1b” also comes from the local file system.Property
configurations.directoryhas valueabsolute-path-of-directory-franks\frank-runner\examples\Frank2Example1\configurations, the “configurations” directory under the “examples/Frank2Example1” instance. This confirms the directory that holds the source code of your configurations.
You can also use the Frank!Console to see what XML code has been loaded. Please do the following:
Click “Configurations” in the main menu (number 1 in the figure below).
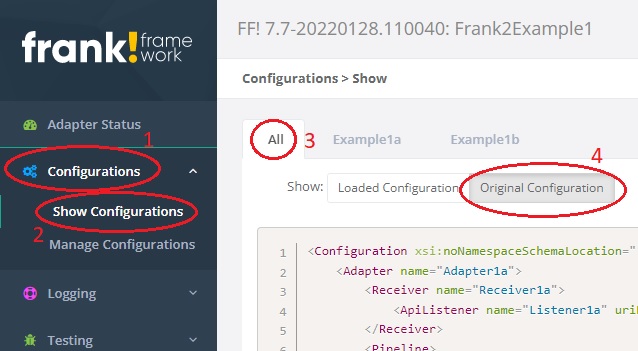
The “Configurations” item expands. Click “Show configurations” (number 2).
You can choose which configuration you want to see. In the figure all configurations are shown (number 3). You can also choose to see one of the configurations “Example1a” or “Example1b”.
Choose “Original configuration” (number 4). With “Loaded Configuration”, you would see a transformed configuration that is used internally by the Frank!Framework. That one is harder to read.
Summary
The Frank!Runner allows you to quickly start the Frank!Framework. After starting it, you can visit its Graphical User Interface, the Frank!Console. The Frank!Console shows you what Frank configurations have been deployed and where their sources are located. A Frank configuration can be compared to a computer program which is independent of the computer on which it is deployed. The role of the computer is played by an instance of the Frank!Framework. The Frank!Framework can host multiple Frank configs, each being presented in its own tab on the Adapter Status page. You can use the Adapter Status screen to reload your Frank configs without restarting the Frank!Framework. This will save you a lot of time.