Hello World Source Code
Introduction
In the previous section you installed the Frank!Runner, a tool to quickly start the Frank!Framework. You saw the directory structure resulting from this installation. There was subdirectory configurations with subdirectories Example1a and Example1b, which were deployed Frank configs.
These directories contain files with extension .xml and files with extension .properties. XML stands for Extensible Markup Language, see https://www.w3.org/XML/. Property files are text files that contain name/value pairs. In this section you start learning how to write these files. The configurations Example1a and Example1b that you encountered in the previous section are almost the same. You will examine the Configuration.xml of Example1a. It reads as follows:
<Configuration
	xmlns:xsi="http://www.w3.org/2001/XMLSchema-instance"
	xsi:noNamespaceSchemaLocation="../FrankConfig.xsd"
	>
	<Adapter name="Adapter1a">
		<Receiver name="Receiver1a">
			<ApiListener name="Listener1a" uriPattern="service1a"/>
		</Receiver>
		<Pipeline>
			<EchoPipe name="HelloWorld" getInputFromFixedValue="Hello World!"/>
		</Pipeline>
	</Adapter>
</Configuration>
Frank configuration
The outer part of Configuration.xml reads:
<Configuration
    xmlns:xsi="http://www.w3.org/2001/XMLSchema-instance"
    xsi:noNamespaceSchemaLocation="../FrankConfig.xsd"
    >
    ...
</Configuration>
You see that an XML schema file FrankConfig.xsd is referenced. This file describes the syntax of Frank configurations. It prescribes which XML elements are allowed and what attributes they can have. Some text editors including Visual Studio Code and Eclipse can flag syntax errors. They can also provide automatic code completion. Finally, they can show information about the meaning of the elements and attributes you are using. This information is included in the XSD. The Frank!Runner takes care of downloading FrankConfig.xsd and putting it in the right directory. Please note the relative path ../FrankConfig.xsd. This path references FrankConfig.xsd from the parent of the directory where Configuration.xml resides.
More information about using FrankConfig.xsd in your text editor can be found at https://github.com/ibissource/frank-runner; please search for “code completion” on that page. More reference information about the Frank!Framework can be found in the Frank!Doc, which you can access through the main menu (see previous section). Here is a screenshot:
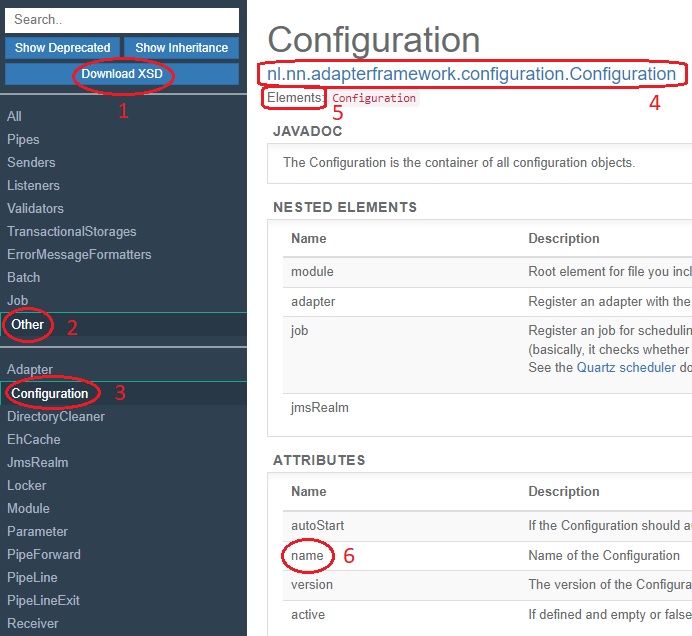
There is a button to download FrankConfig.xsd manually (number 1). You may need it if you are not using the Frank!Runner. To understand the Frank!Doc, you need to know that each XML element that you can use corresponds to a Java class in the source code of the Frank!Framework (publicly available on GitHub). For your convenience, we have divided these Java classes in groups. You can select a group in the top-left menu (number 2). Then you can select a Java class in the bottom-left menu (number 3). To the right, you see information about the Java class. You have the full name of the Java class (number 4). You see what XML elements you can use to reference the class (number 5). In the case of Java class Configuration, the only way to reference it is <Configuration>, but there are Java classes that can play different roles within a configuration. Such Java classes have multiple XML elements.
You see that a <Configuration> element can have a name attribute (number 6). This attribute has not been set, because the Frank!Framework can use the directory name to name the configuration. If you structure your configurations in a different way, you may have to set the name attribute for your configuration.
Adapter
When we examine the contents of the <Configuration> tag, we find the following:
...
<Adapter name="Adapter1a">
    <Receiver name="Receiver1a">
        ...
    </Receiver>
    <Pipeline>
        ...
    </Pipeline>
</Adapter>
...
An adapter is a service that is triggered by a receiver and executes a pipeline in response. It can be compared to a subroutine in programming languages. The receiver defines how the input message is obtained. The pipline defines how the input message is processed. The pipeline produces an output message that may be used by the receiver to produce a response. The <Receiver> tag configures the receiver and the <Pipeline> tag defines the pipeline.
Receiver
Our receiver reads:
...
<Receiver name="Receiver1a">
    <ApiListener name="Listener1a" uriPattern="service1a"/>
</Receiver>
...
It has name Receiver1a. Its further definition is provided by the tag within: <ApiListener>. Listeners
are building blocks that accept input. The choice for <ApiListener> means that the adapter “Adapter1a” listens to
RESTful HTTP requests and that the HTTP endpoint should be described in an OpenAPI Specification (see https://swagger.io/specification/).
There are other listeners, for example <JavaListener> and <DirectoryListener>. JavaListener makes your adapter listen to direct Java calls. DirectoryListener triggers your adapter when a file is added to a chosen directory on a (server-side) local file system. The Frank!Doc has a group that contains all listeners.
Pipeline
The pipeline defines how the message provided by the receiver should be processed. It reads:
...
<Pipeline>
    <EchoPipe name="HelloWorld" getInputFromFixedValue="Hello World!"/>
</Pipeline>
...
A pipeline is a network of pipes. Pipes are predefined functions that can be performed on the incoming message. The <EchoPipe> by default echos the input message as the output message; using attribute getInputFromFixedValue it can be used to produce a fixed value as output. In the remainder of the Getting Started chapter, we will see pipes with more interesting functions, like applying XSLT transformations and sending data to a database. The Frank!Doc has a group “Pipes” that holds all available pipes.
The shown example pipeline only transforms the incoming message to an output message, but you can also send output to external systems. Please see the following screenshot of the Frank!Doc:
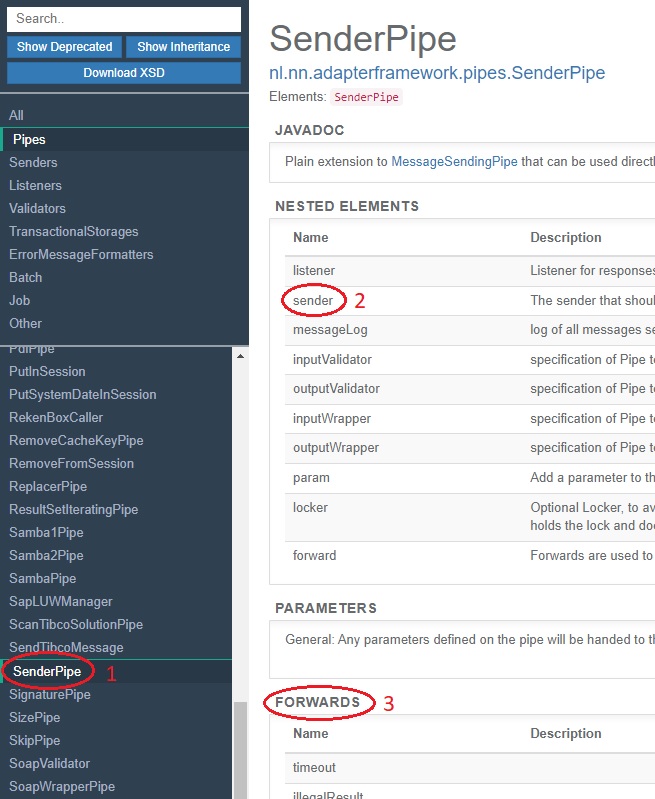
When you want to send data to an external system, you use pipe <SenderPipe> (number 1). A <SenderPipe> can have a sender inside (number 2). When you hover over that word, you get the list of allowed child elements. You can also search senders by selecting group “Senders” in the top-left menu. The choice of the sender and its configuration determine how the input message to the <SenderPipe> is sent. In section Sending to Database, you will see that a <FixedQuerySender> can be used to write data to a database.
By default, pipes are executed in sequential order. If your pipeline needs to branch, you will need the <Forward> tag to reference the next pipe to execute. Each pipe defines a list of forwards (number 3), which are the possible exit states of the pipe. The <Forward> tag has attributes name and path. When the pipe exits with the state referenced by name, it will go to the pipe referenced by path. You can see that the <SenderPipe> has a forward named timeout. If you want special processing when a timeout occurs, you need a <Forward> tag with name="timeout" inside the <SenderPipe>. You give this forward a path attribute to reference the pipe to execute.
If you want error handling, you need the <Exits> tag to define all possible end states of your pipeline. You can find more information in the Frank!Doc, Java classes PipeLineExits and PipeLineExit.
Conclusion
You studied a simple adapter that is included as an example within the Frank!Runner. It shows the basic structure of a Frank configuration, which consists of XML tags <Configuration>, <Adapter>, <Receiver> and <Pipeline>. Within a <Receiver>, you configure a listener that determines the source of the input message. Within a <Pipeline>, you configure how the input message is processed. You do so by building a network of pipes as the predefined building blocks. Pipes are executed in sequential order by default, but you can implement branching by connecting pipes using the <Forward> tag.
The Frank!Doc gives reference information about all these tags. It defines groups that you can use to browse all pipes and all listeners. There is also a group for all senders, which are used to send messages to external systems.
In the next section, Testing Pipelines, we will see the examined adapter in action and we will learn how to test pipelines.