Database Initialization
Introduction
We continue our case study about the imaginary firm NewHorizons, see Example: New Horizons and New Horizons Requirements. In section Example: New Horizons you started development by creating the file franks/Frank2Manual/configurations/NewHorizons/Configuration.xml. You will extend this configuration by adding files to your directory NewHorizons.
The Frank!Framework allows configurations to access a database. Different brands of databases are supported, for example Oracle, MySql and MsSQL. Many databases require you to start a separate executable in addition to the Frank!Framework. An exception is the H2 database. The Frank!Runner configures a H2 database by default, so in this tutorial no action is needed to start the database. Database initialization does not happen automatically; this is the subject of the next subsection.
Enable Liquibase
The Frank!Framework can take care of database initialization. Database initialization should happen when an enterprise application starts for the first time. When an enterprise application is restarted later, database initialization should be omitted because data in the database should be persistent.
The Frank!Framework internally uses Liquibase to initialize the database. The Frank!Framework contains Liquibase, so no action is needed to install it. The Frank!Framework should be configured however to switch it on. Please do the following:
Add file
StageSpecifics_LOC.propertiesand give it the following contents:jdbc.migrator.active=true
Note
You can use many different property files to configure properties. When you choose
StageSpecifics_LOC.properties, your settings will not be applied when your configuration is deployed on production. If you would chooseDeploymentSpecifics.properties, your settings would also be used in production, provided they are not overruled. More details are in section Properties, but before reading that section please finish this chapter first.
Liquibase expects a so-called changelog, an XML file that defines the data model and the initial data.
Please create file
DatabaseChangelog.xmlin theNewHorizonsdirectory. Add XML to initialize the database described in the previous section New Horizons Requirements. Here is the XML to add:<?xml version="1.0" encoding="UTF-8"?> <databaseChangeLog xmlns="http://www.liquibase.org/xml/ns/dbchangelog" xmlns:xsi="http://www.w3.org/2001/XMLSchema-instance" xmlns:ext="http://www.liquibase.org/xml/ns/dbchangelog-ext" xsi:schemaLocation="http://www.liquibase.org/xml/ns/dbchangelog http://www.liquibase.org/xml/ns/dbchangelog/dbchangelog-3.0.xsd http://www.liquibase.org/xml/ns/dbchangelog-ext http://www.liquibase.org/xml/ns/dbchangelog/dbchangelog-ext.xsd"> <changeSet id="1" author="martijn"> <createTable tableName="booking"> <column name="id" type="int"> <constraints primaryKey="true" nullable="false"/> </column> <column name="travelerId" type="int"> <constraints nullable="false"/> </column> <column name="price" type="decimal"> <constraints nullable="false" /> </column> <column name="fee" type="decimal"> <constraints nullable="false" /> </column> </createTable> </changeSet> <changeSet id="2" author="martijn"> <createTable tableName="visit"> <column name="bookingId" type="int"> <constraints nullable="false"/> </column> <column name="seq" type="int"> <constraints nullable="false"/> </column> <column name="hostId" type="int"> <constraints nullable="false"/> </column> <column name="productId" type="int"> <constraints nullable="false"/> </column> <column name="startDate" type="date"> <constraints nullable="false"/> </column> <column name="endDate" type="date"> <constraints nullable="false"/> </column> <column name="price" type="decimal"> <constraints nullable="false"/> </column> </createTable> </changeSet> <changeSet id="3" author="martijn"> <addPrimaryKey tableName="visit" columnNames="bookingId, seq" /> </changeSet> <changeSet id="4" author="martijn"> <addForeignKeyConstraint constraintName="FK_VISIT_BOOKING" baseTableName="visit" baseColumnNames="bookingId" referencedTableName="booking" referencedColumnNames="id" /> </changeSet> </databaseChangeLog>
Information about the syntax of DatabaseChangelog.xml can be found at https://docs.liquibase.com/change-types/home.html. More information about databases is available in section The Database.
Note
You just added jdbc.migrator.active=true and DatabaseChangelog.xml for a specific configuration, NewHorizons. If the data you
are initializing is not specific for a configuration, you need to add these in the classes directory. See
Deployment Environment Characteristics for background information. A DatabaseChangelog.xml in the classes folder is only executed if there is also a Configuration.xml in the classes folder and if that configuration is not deactivated with attribute active (see the Frank!Doc). Setting jdbc.migrator.active=true in the classes folder is always effective; no matter if there is a Configuration.xml.
Test your database
You can test your work by querying the tables you created, “booking” and “visit”. Please continue as follows:
Click “JDBC” (number 1 in the figure below). This link will expand.
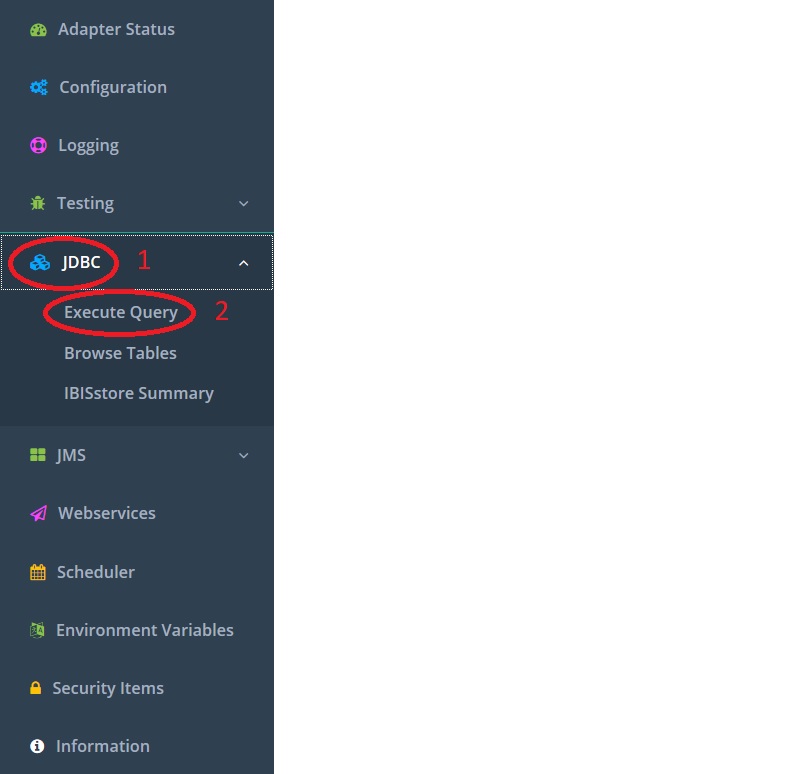
Click “Execute Query” (number 2). The following screen appears:
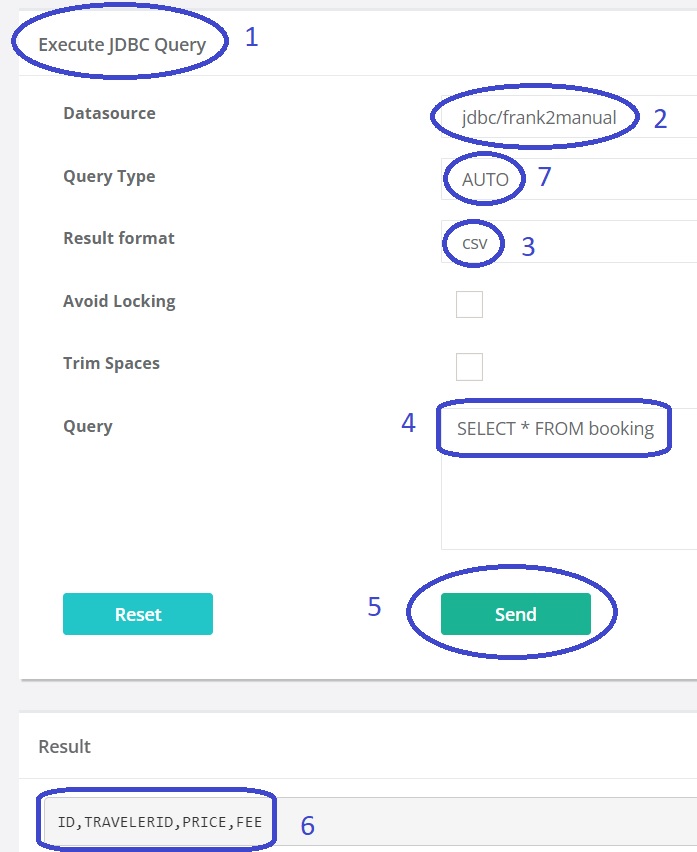
You see you are in the JDBC Execute Query screen (number 1). Select “Datasource” “jdbc/frank2manual” (number 2).
Note
For more information, see section The Database.
You can choose to have comma-separated (csv) output instead of XML (number 3).
Leave the Query Type to “Auto”. You only need to change it for complicated queries for which the Frank!Framework cannot sort out whether a value is returned or not.
Enter query
SELECT * FROM booking(number 4).Press “Send” (number 5). You will see the result
"ID","TRAVELERID","PRICE","FEE"(number 6). You have verified that the “booking” table exists.Verify that table “visit” exists by executing the query
SELECT * FROM visit. Check that the result of this query is"BOOKINGID","SEQ","HOSTID","PRODUCTID","STARTDATE","ENDDATE","PRICE".
Note
Please do not modify existing change sets. When you have new requirements for initial data, please add new change sets. On start-up, the Frank!Framework checks which change sets have been executed and which change sets are new. Only new change sets are executed. This only works when existing change sets never change.
Note
If you are developing on the changelog within your own project, you will probably make some errors. In this situation, you want to remove all database tables to rerun all change sets within your changelog. You can do this using the query DROP ALL OBJECTS. After running it, reload your configuration with the Full Reload button in the adapter status page, see General structure of the example Frank application.
Solution
If you did not get your database working, you can download the solution for the work you did so far.