The Database
In this section, we continue the story on how to monitor and debug an instance of the Frank!Framework using the Frank!Console. The Frank!Framework manages a relational database to store persistent data. Relational databases provide concurrent and transactional access to their data. For general information, see for example this oracle page. It is up to the Frank developer to use the database correctly, such that data integrity is ensured.
In this section, you learn how you can browse and modify the database. You will see what the example configuration you executed in section Adapter Status is intended to do: it writes data into the database. Please do the following:
In the main menu, click “JDBC” (number 1 in the figure below) to open it.
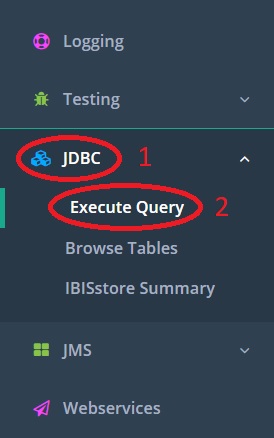
Click “Execute Query” (number 2) to select it. You see the page shown below.
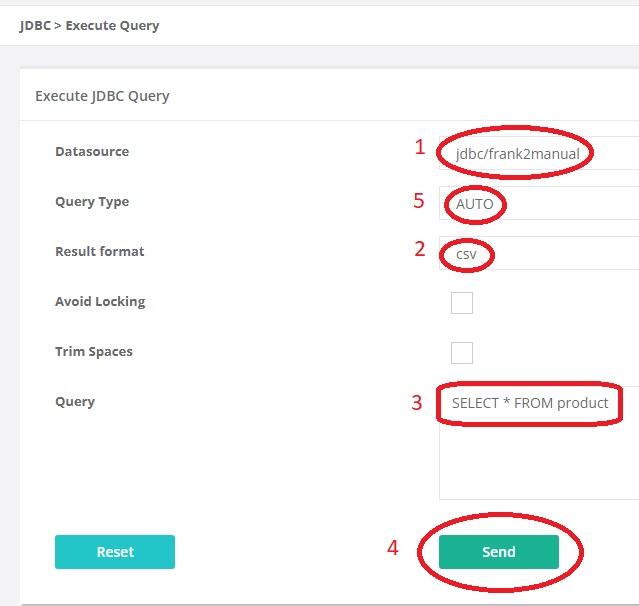
First select the datasource (number 1), the database name. See chapter Administrator Manual for more details. In this tutorial, your only choice is “jdbc/frank2manual”. It should be selected automatically.
Note
Upon delivery of a Frank config, the developer should inform you what database names are used. It is up to the system administrator to configure them, linking the names to the actual resources. The developer or the system administrator should tell you as a site owner what database names exist and what their roles are.
There is always at least one database, which almost always has its name derived from the instance name of the deployment. In this tutorial, the instance name is “Frank2Manual”. The name of the database is calculated by replacing capitals by lower-case letters and prepending the string “jdbc/”, resulting in “jdbc/frank2manual”.
Do not be worried that the database name depends on a property that can have a different value for different deployments. The Frank!Framework is capable of handling this.
You are going to query the database. You can choose the output format (number 2). Choose “csv”.
You should enter your SQL query in the text box marked with number 3. The example configuration writes to table “product”, so you want to see the contents of this table. The SQL query to see all data within table “product” reads
SELECT * FROM product. Please enter this text.Note
The SQL language (Standard Query Language) is almost the same for every database that supports it. There are many resources on the internet for learning the SQL language. For advanced queries, you may want to learn the SQL dialect of your database vendor. When you use the Frank!Runner, the brand of your database is “H2”.
Leave the Query Type (number 5) to “Auto”. You only need to change it for complicated queries for which the Frank!Framework cannot determine whether a value is returned or not.
Press “Send”. Below the “Send” button, the result appears. It should be something like the following:
PRODUCTID,ADDRESS,DESCRIPTION,PRICE
1,Jackson Square 1,Apartment with living room and kitchen within the city center,100.00
2,Churchill Avenue 100,"Beautiful house at an avanue, near the ambassies",300.00
You are seeing a table, each row being a record. The field names are shown in the first row. To clear the result, you can press “Reset” (shown in the last figure, not numbered).
You learned how to view data. When you want to insert or update records, you have to enter a different query in the text box numbered 3. Please consult the internet to learn the right syntax.
Warning
In production, you are strongly discouraged to modify your data this way. Maintaining the data should be the responsibility of the Frank configs you deployed. A wise system administrator should configure security such that only authorized operators can use this page of the Frank!Framework. For more information, see Administrator Manual.