Management
In the preceeding sections, you have learned how to monitor the status of the Frank!Framework and how to investigate issues. In this section you will start learning what you can do as a site owner. This section is about temporarily stopping adapters and receivers. The next section Uploading configurations is about uploading new versions of a Frank config. If you are also a system administrator, you also need to read chapter Administrator Manual.
In this chapter, you continue learning about Scheduling a task for periodic execution. The final section Processed Messages is also important; you learn about auditing and about fixing messages for which processing has failed. Finally, section Disk Usage gives you some tricks to reduce the amount of data stored by the Frank!Framework.
If your site is experiencing issues, you may want to temporarily stop receivers or adapters. To investigate this function of the Frank!Console, we continue with the example configuration about the imaginary company New Horizons. In the preceeding sections, you first deployed this configuration on your instance of the Frank!Framework. Then you learned the following about this configuration:
The config watches directory
work\inputfor new files to appear. These should be.csvfiles with field separator;.In section Ladybug, you examined what the config does.
You encountered
adapterGetDestinations. This adapter reads a file, transforms it to XML and delegates processing.You encountered
adapterProcessDestination. This adapter processes a piece of XML that represents an apartment. It writes the information to the database.
In the Adapter Status page, you saw that there are also two receivers, receiverGetDestinations and receiverProcessDestination. These receivers are responsible for receiving the messages that their adapters process. You will learn what happens when an adapter is in state Started while the corresponding receiver has stopped.
To see what you are doing, you need to know about another feature of the example configuration. It manages the following directories:
work\inputwork\processingwork\processedwork\error
You already learned that the config watches directory work\input. If a new file is seen, it is moved to work\processing. If processing succeed it is moved to work\processed. If processing fails, it is moved to work\error. This feature of the configuration is very useful for our investigation, because we can quickly see whether a message was processed at all, whether processing succeeded or whether processing failed.
Note
If you are a Frank developer, it may interest you that moving files between these directories is a feature of the <DirectoryListener> listener.
Before we start our investigation, we clean up our system. Please do the following:
Using a Windows Explorer or a command prompt, ensure that the four mentioned directories are empty. Do not delete the directories themselves.
Within JDBC | Execute Query, execute the following query:
DELETE FROM product
Test that you deleted all records of table “product” by issuing the following query:
SELECT * FROM product
You have cleaned up your system. It is like it was before you processed your first input file. You can start the experiments about stopping receivers and adapters now. Please continue as follows:
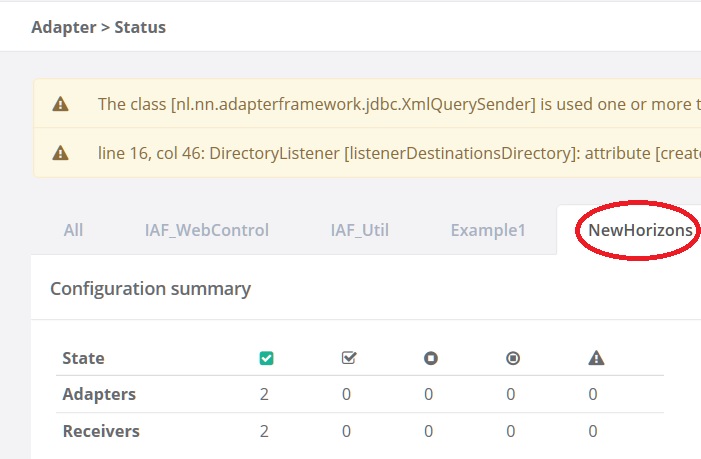
First select tab “NewHorizons” in the Adapter Status page as shown below. This way, you only see the adapters and receivers of that Frank config.
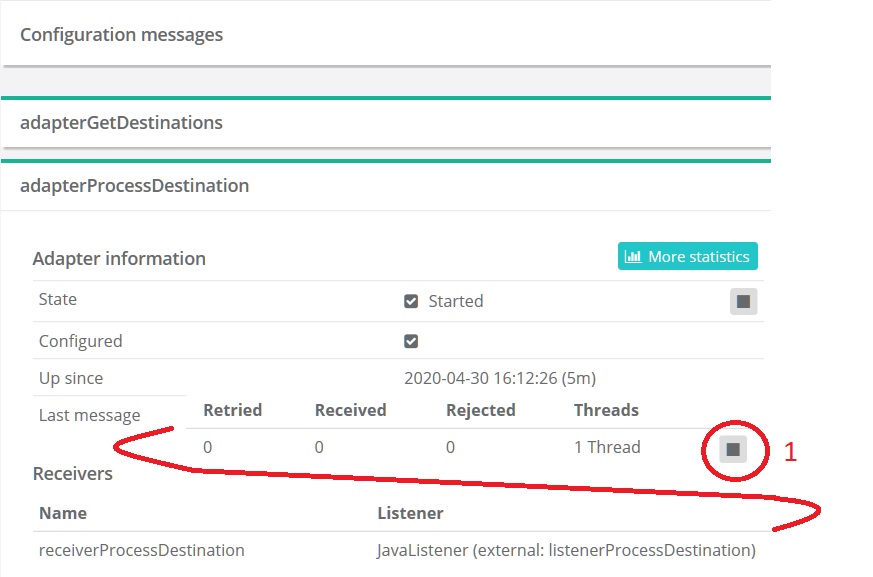
Expand the messages of “adapterProcessDestination” as shown below. Stop receiver “receiverProcessDestination” with the button numbered 1. This button is to the far right of the page as has been shown using the red line.
The button changes two times. First it becomes an orange cog indicating that the receiver is stopping. Then it becomes a triangle, giving you the option to restart the receiver.
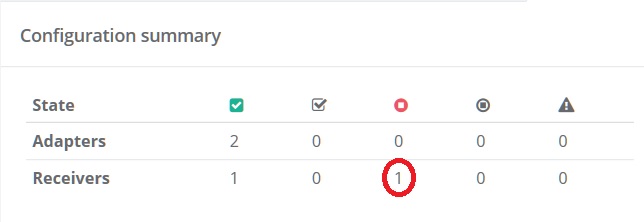
Check that the configuration summary panel looks as shown. You should see one stopped receiver.
Open a text editor and fill it with the following contents:
1;Jackson Square 1;Apartment with living room and kitchen within the city center;100.00
2;Churchill Avenue 100;Beautiful house at an avanue, near the ambassies;300.00
Note
You will need this text a few times when you do this page. It is wise to keep your editor open until you are done with this page.
Save the text to file
franks/frank-runner/work/input/example.csv.Note
There may be text editors that prevent an open file from being deleted. If this applies to you, please perform this step a bit different. You can put the text in another file and then copy that file to the intended location. When you use Visual Studio Code as your text editor, you do not have this issue.
In a command prompt, check that file
work\input\example.csvvanishes and that filework\error\example.csvappears. This indicates that processing is attempted but fails.Go to Ladybug, press “Refresh” and select the test report corresponding to your action in the top-left part of the page.
Expand the test report in the bottom-left. By expanding the right nodes, you should get the following figure:
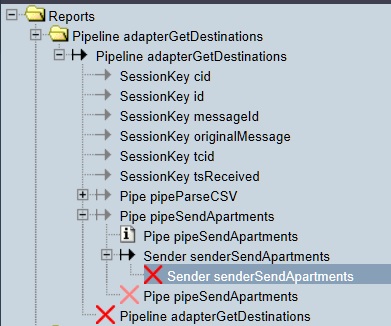
Select the node that is selected in the figure. To the bottom-right, you should see the following error message:
IbisJavaSender [senderSendApartments] exception processing message using request processor [listenerProcessDestination]: (DispatcherException) no RequestProcessor registered for [listenerProcessDestination]
You see that the sender that sends messages to your stopped receiver fails.
In JDBC | Execute Query, execute query
SELECT * FROM product. You should still have no records.Restart receiver “receiverProcessDestination”. Do this by pressing the button shown in step 5.
In the configuration summary panel of the Adapter Status page, check that all adapters and receivers have been started again. You may want to select the “NewHorizons” tab to see it better.
Below the configuration messages panel, look at adapter “adapterGetDestinations”. At the far-right, you see the following:

One message was read and one failed.
Expand this adapter and lookup the “receiverGetDestinations” receiver. Press the button to the far-right to stop it.
Wait until the button becomes a triangle.
Take the text of step 8 and save it to file
work\input\example2.csv.Wait about a minute. You will see that the file you wrote is not moved like before.
The receiver “receiverGetDestinations” is the component supposed to see example2.csv. It has been stopped and thus does not perform its duty.
The adapter “adapterGetDestinations” is still in state Started. You will now apply a workaround to process file example2.csv.
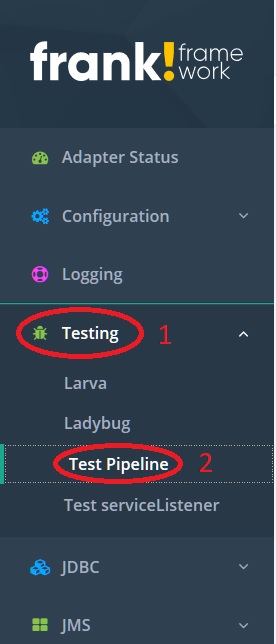
In the main menu, click “Testing” (number 1 in the figure below). Then click “Test Pipeline” (number 2).
You are in the Test Pipeline page. Please select adapter “adapterGetDestinations” (number 1 in the figure below). In the message field, enter the text
work\input\example2.csv(number 2). Then press “Send” (number 3). To the top, you see the exit state of the adapter, which should be “success” (number 4).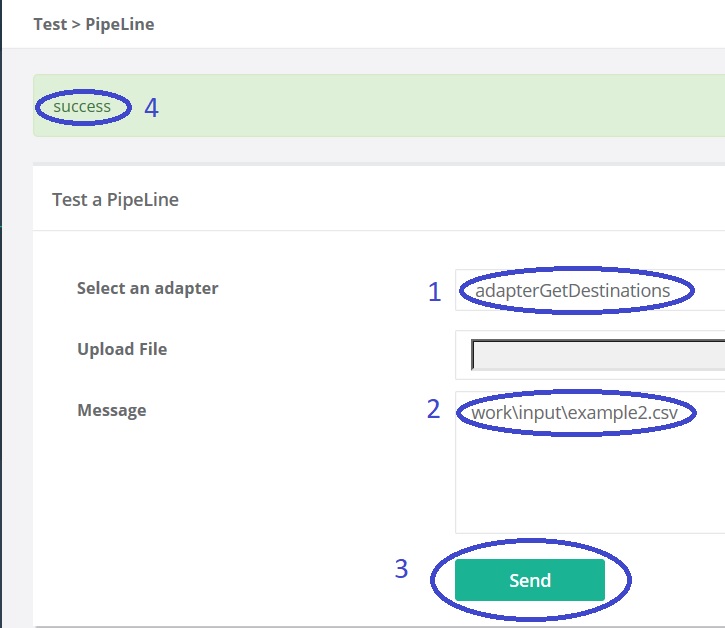
Note
The Frank developer who gave you the configuration can tell you the meaning of the exit state you see. For example, be prepared to see “success” if there was some error that was successfully handled.
The result should appear to the bottom of the Test Pipeline page. Check that it is:
<results>
<result item="1">
<result><rowsupdated>1</rowsupdated></result>
</result>
<result item="2">
<result><rowsupdated>1</rowsupdated></result>
</result>
</results>
In JDBC | Execute Query, execute query
SELECT * FROM product. You should now have two records.But file
work\input\example2.csvstill exists and the directorieswork\processing,work\processedare still empty. Directorywork\erroronly containsexample.csv, the file that failed because receiver “receiverProcessDestination” was stopped when that file was processed. Please check all this.
The Test Pipeline screen allows you to pass messages directly into adapters, bypassing the receiver. Moving file work\input\example2.csv is the job of the receiver, however, and therefore the file is not moved.
Warning
Wise system administrators should prevent unauthorized users from accessing the Test Pipeline page. Using this feature in your production environment is strongly discouraged, because the receivers you bypass perform important tasks. In the example above, input file work\input\example2.csv might be processed again if the receiver would start again. See also Administrator Manual.
Please restart receiver “receiverGetDestinations” like explained. In the next section, you may want to have all adapters and receivers in state Started.
As a final note, please see the figure below. It shows a few useful buttons. With the buttons numbered 2, you can stop and start all adapters of the selected tab. With the buttons numbered 3 you can expand / collapse all adapters.