Preparations
As said in section New Horizons, this chapter on the Frank!Console is a tutorial, allowing you to practice. Before you dive into the Frank!Console, you need to install the Frank!Framework. The Frank!Framework can be executed in different ways. The simplest way to execute the Frank!Framework is to use the Frank!Runner. Please do the following to prepare yourself for this tutorial:
If you do not have git already, download it from https://git-scm.com/downloads.
Choose some working directory in which you will install the Frank!Runner and do the exercises of the Frank!Manual, say
franks.In a command prompt, go to your
franksdirectory and clone the Frank!Runner with the following command:franks> git clone https://github.com/ibissource/frank-runner
Check that your directory
frankshas a subdirectoryfrank-runner.Within
franks, create a subdirectoryFrank2Manual.Within
franks/Frank2Manual, create subdirectoryconfigurations.Within directory
franks/frank-runner, create text filebuild.propertiesand give it the following contents:project.dir=Frank2Manual
Download the
Frank configthat you will deploy on the Frank!Framework. Save it asfranks/Frank2Manual/configurations/forFrankConsole.zip.Right-click this file and choose “Extract All…”. You see the dialog shown below:
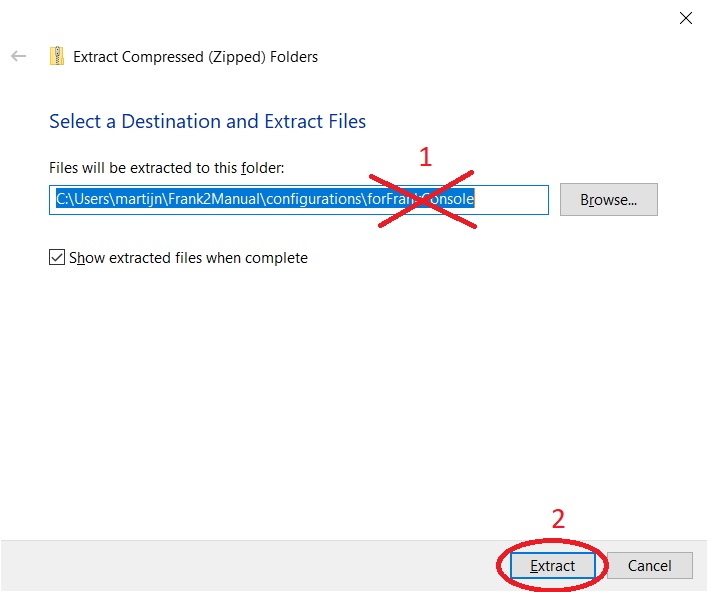
Within this dialog, remove the last path component
forFrankConsolelike indicated with number 1. The zipfile itself already contains subdirectory “NewHorizons”.Warning
Many zipfiles you download from other places in the Frank!Manual are different. Those others do not wrap their files within a root directory. In those cases you do not remove the last path component. In this chapter we use download zips with a root directory because we need them that way in section Uploading configurations.
Press “Extract” (number 2).
Check your directory structure. It should be as shown:
franks
|- Frank2Manual
   |- configurations
      |- NewHorizons
         |- Configuration.xml
         ...
|- frank-runner
   |- build.properties
   ...
As said in section New Horizons, the Frank config you are deploying processes .csv files. The directory in which they are expected is configurable by setting a property named work. You will set property work to the value work, a directory relative to franks/frank-runner. When you do this, the example Frank configuration expects input files in directory work/input. The example configuration expects that this directory exists, and also that some other directories exist.
Create the following directories:
franks/frank-runner/work/inputfranks/frank-runner/work/processingfranks/frank-runner/work/processedfranks/frank-runner/work/error
When you start the Frank!Runner you also need to set a property named jdbc.migrator.active, indicating that the Frank!Framework should create initial data. With this property set, the example configuration will create table product.
Start the Frank!Runner with the following command:
> start.bat -Djdbc.migrator.active=true -Dwork=work
Note
The Frank!Runner is using Apache Tomcat under the hood. Apache Tomcat is a Java application. The arguments
-Djdbc.migrator.active=trueand-Dwork=workare added to a shell command that starts up the Java Virtual Machine (JVM). If you are not using the Frank!Runner to start the Frank!Framework, there may be a different way to set properties.Open a webbrowser and browse to http://localhost.