Uploading configurations
In the previous section, you learned how to temporarily stop adapters and receivers. This section continues about changes you can apply to your site. We focus here on deploying Frank configs. What options do you have to deploy a Frank configuration?
Until now, the configuration you used was stored on the file system of your computer. In section Preparations, you were instructed to put the config NewHorizons in a subdirectory of franks/Frank2Manual/configurations. First you will continue this way. You will learn how to deploy a new version without restarting the Frank!Framework. After this, you will learn how to deploy your Frank configs on your database, which has some advantages on your production environment.
Deploying a new version
To see how to deploy a new version of a configuration, please do the following:
Please do section Preparations if you did not do so already. The Frank!Runner should be running after this step.
Please go to JDBC | Execute Query.
Perform the following SQL query:
SELECT * FROM product. You should see that you have the following fields:PRODUCTID
ADDRESS
DESCRIPTION
PRICE
You get a new version of the NewHorizons config. Please
downloadit.Extract this .zip file, overwriting
franks/Frank2Manual/configurations/NewHorizons.Warning
This zipfile also contains subdirectory “NewHorizons”. When you use “Extract All…” like you did in section Preparations, you are advised to remove the last path component. You are also advised to delete the old NewHorizons directory before writing the new one.
Go to the Adapter Status page and press the Reload button (number 1 in the figure below). This loads the files you just extracted from your .zip file.

Please select tab NewHorizons. You should now see three adapters and three receivers. The new version of the NewHorizons configuration has an extra adapter. You will use this adapter in the next section Scheduling.
Please go to JDBC | Execute Query and execute the following SQL query:
SELECT * FROM product.Check that there are five fields instead of four, the extra field being “MODIFICATIONDATE”.
In the next subsection, you will use the previous version of the NewHorizons configuration again. You need to undo adding the “MODIFICATIONDATE”. Please do the following:
Go to JDBC | Execute Query.
Execute query
DROP ALL OBJECTS.Execute query
SELECT * FROM product. This query should fail now because you deleted all tables and everything else in your database.Warning
You see how powerful the JDBC | Execute Query page is? You really need security on your production site, see section Administrator Manual.
Stop the Frank!Framework.
Delete all files from
work\input,work\processing,work\processed,work\error, but not the directories themselves.Remove directory
franks\Frank2Manual\configurations\NewHorizons
Configurations in the database - tutorial
Now you are ready to upload Frank configs to the database. Doing so has two advantages:
You share the same Frank config with all instances that read the same database.
The Frank!Framework allows you to store multiple versions at the same time, allowing you to quickly switch which version you are using.
Please continue as follows:
Start the Frank!Runner with the following command:
franks\frank-runner> start.bat -Djdbc.migrator.active=true -Dconfigurations.names="${instance.name.lc},NewHorizons" -Dconfigurations.NewHorizons.classLoaderType=DatabaseClassLoader -Dwork=workNote
It is not realistic to use the Frank!Runner when you store your Frank configs in the database. The Frank!Runner is meant for development. During development, it is much easier to have your files on your local filesystem. For this tutorial, however, using the Frank!Runner is the easiest way to demonstrate uploading configurations to the database.
Note
There will be another way, but only when issue https://github.com/frankframework/frankframework/issues/927 will have been fixed.
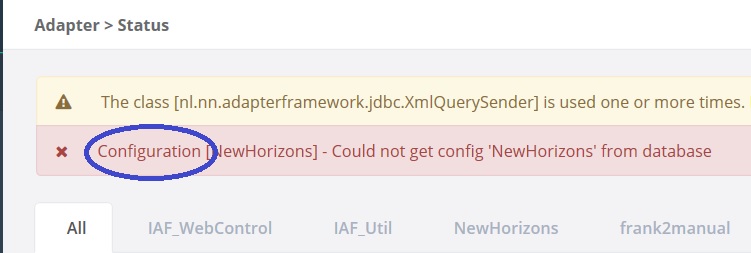
Go to the Adapter Status page. You should see a message that configuration “NewHorizons” was not found in the database, see below:
In the main menu, please click “Configuration” to open it (number 1 in the figure below):
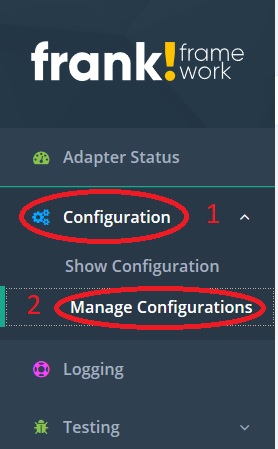
Select “Manage Configurations” (number 2). You should see the page shown below:

You should see that configuration “NewHorizons” is red, because it is not available yet (number 2). Please press “Upload Config” (number 1). This button is to the far-right as is shown with the red line. You should see the following page:
Download the
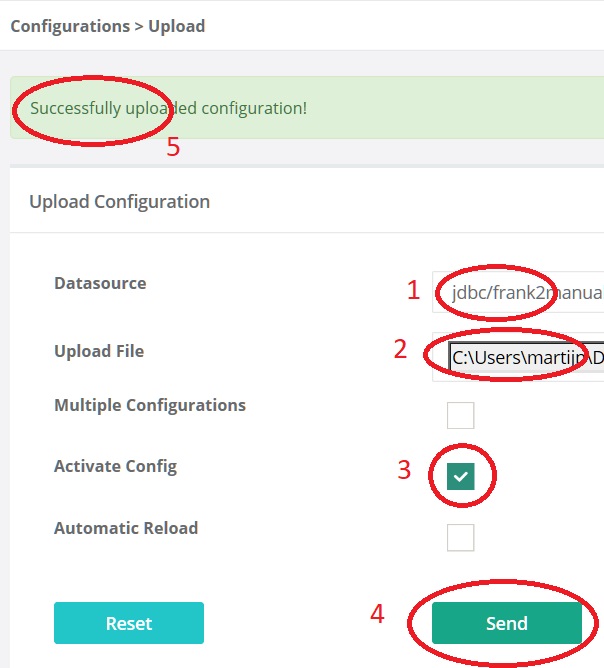
original versionof the NewHorizons configuration if you do not have it anymore. It is not important where you save it.Select your database by its name (number 1), like you did in the JDBC | Execute Query page in section The Database. You have only one choice.
Next to number 2 you have a “Browse…” button. Press it and select the zipfile you just downloaded.
Check “Activate Config” (number 3).
Press “Send” (number 4). To the top, a green bar should appear indicating success (number 5).
To the top-right, there is a button named “Back” (not shown). Please press it.
You return to the screen shown in step 4. The NewHorizons configuration (number 2) is still red!
Please go to the Adapter Status page.
Press the reload button (number 1 in the figure below):
Wait until the reload butten returns to its original colour.
Warning
The adapters should become green in the Configuration Messages panel, but the “Could not get config” error does not vanish, because messages in the Configuration Messages panel are only removed after restarting the Frank!Framework.
Go back to Configuration | Manage Configuration. You see the page shown below:
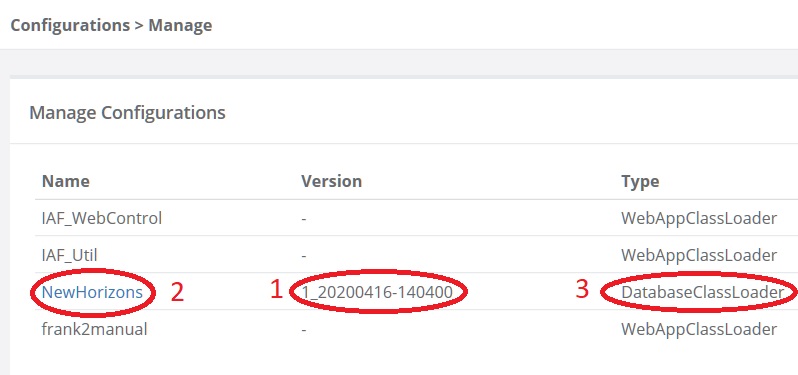
Configuration “NewHorizons” is no longer red (number 2). You also see a version string (number 1). Remember that you can have multiple versions of the same Frank config in your database. Only one version can be running, though.
Note
The version string is derived from a file that should be present in the uploaded configuration. The uploaded configuration should contain the file
BuildInfo.properties. Adding this file is the responsibility of Frank developers. The contents of this file should look like this:instance.version=[some_value] configuration.version=[some_value] configuration.timestamp=[some_value] configuration.commit=[some_value] configuration.pipeline=[some_value] user.name=[some_value] user.fullname=[some_value]
Here the
configuration.versionproperty is especially important as this property is needed to display the version in the Frank!Conolse.Go to JDBC | Execute Query.
Execute the following SQL query:
SELECT * FROM product.Check that you see four fields:
PRODUCTID,ADDRESS,DESCRIPTION,PRICE.Now execute the query
SELECT name, version, activeconfig FROM ibisconfig. You should get the following output:NAME,VERSION,ACTIVECONFIG NewHorizons,1_20200416-140400,true
Note
The Boolean field ACTIVECONFIG stores the value of the “Activate Config” checkbox, which you checked when you uploaded the NewHorizons config (step 9).
You have verified that you successfully uploaded the original version of the NewHorizons configuration. You verified that this is shown in the Adapter Status page and the Manage Configurations page. You verified that the initial data has been created; table “product” exists and has four columns. You also saw which table in the database contains your uploaded config.
Now you are ready to upload the next version of the NewHorizons configuration. Please continue as follows:
Please download the
next versionof the NewHorizons configuration. It does not matter where you save it.Go to Configuration | Manage Configurations.
The NewHorizons configuration is a link. Please click it. You enter the “Manage NewHorizons” screen (number 1 in the figure below), showing all versions of the “NewHorizons” config.
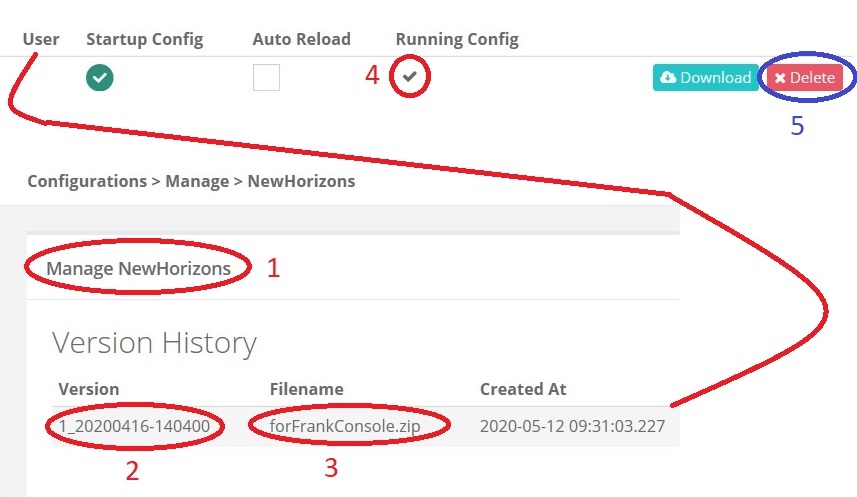
You see a table. Each row starts with version id (number 2) and the file name used to upload it (number 3). Only one version can be running and the running version has a checkmark (number 4). You also have a button to delete this version from the database (number 5).
Press the “Back” button to the top-right (not shown).
Press “Upload Config”.
See the figure below. Using the “Browse…” button next to number 1, select the next version of the “NewHorizons” config that you downloaded in step 22.
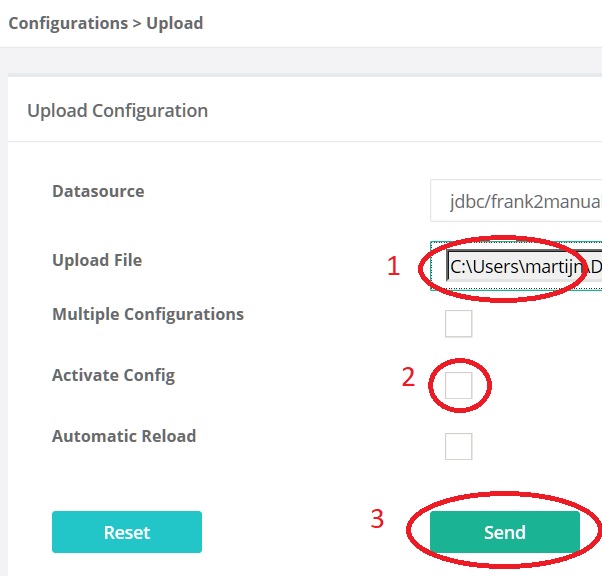
Leave the “Activate Config” (number 2) checkbox unchecked.
Press “Send” (number 3). To the top you should see a green bar that uploading succeeded (not shown).
Warning
The “Active Config” config has become checked. This is the initial state of this checkbox. Apart from the success bar the page has been reset, allowing you to easily upload another Frank config.
Press the “Back” button (not shown).
Click “NewHorizons” to go to the “Manage NewHorizons” page.
You see the figure below. Look at the line with Filename “forFrankConsole_2.zip” (number 1), the second version of the “NewHorizons” config.
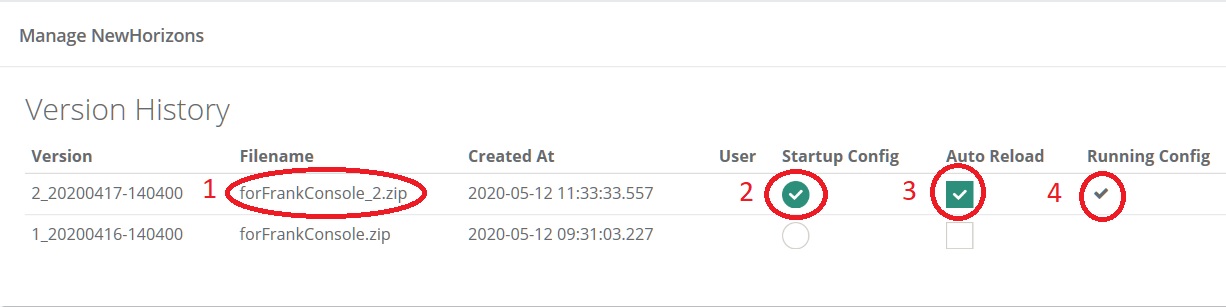
First check “Auto Reload” (number 3). Then check “Startup config” (number 2).
The Frank!Framework will now activate the second version of “NewHorizons” and this config will be reloaded automatically. Please wait about a minute and refresh your browser. You will see that the “Running Config” checkmark will move to the “forFrankConsole_2.zip” line (number 4).
To verify that the new version is running, please go to JDBC | Execute Query.
Execute the following query:
SELECT * FROM product. Check that you new see column “MODIFICATIONDATE”.
Configurations in the database - summary
You learned the following. Uploading configurations to the databases has two advantages. First, you share the same Frank config with all instances that read the same database. Second, the Frank!Framework allows you to store multiple versions at the same time, allowing you to quickly switch which version you are using.
Four pages are relevant to manage Frank configurations that are stored in the database. First, you need the Adapter Status page to reload configurations. You also reload a Frank config when you restart the Frank!Framework, but using the reload button is quicker and does not cause downtime for a production site. Second, you have the Manage Configurations page that gives you an overview of all Frank configs. Each config that is uploaded to the database is a link, bringing you to a page to manage a specific config. You can use the Manage Specific Config page to activate and run another version of a Frank config, and you can delete versions here from the database. You do not upload configs here. You do all uploads by pressing “Upload Config” button in the Manage Configurations page.
An activated config is not automatically running. Both in the Upload Configuration page and in the Manage Specific Configuration page, you have checkboxes to activate a configuration and to auto-reload a configuration. If you activate without auto-reloading, you have to manually reload using the Adapter Status page. If you activate with auto-reloading enabled, the Frank!Framework will auto-reload your new version within about a minute. In that case you do not need to manually reload.
When multiple instances of the Frank!Framework are accessing the same database, you can use the auto-reload checkbox to synchronize. When you use this option, all instances will start using the new version at the same moment.