Read other reports
Warning
You cannot practice this section at the moment because of issue https://github.com/ibissource/ibis-ladybug/issues/188. You cannot properly sort reports in Ladybug. This section will be updated when the bug has been fixed.
This section continues exploring what you can do by editing test reports. You started editing test reports in subsection Edit test reports. When the system-under-test changes, you can update test reports to reflect the new reality. You can copy test reports and edit the copy. This way you can create multiple similar automated tests without having to do them all by hand. A special way to copy them is to use the “Clone” button, as is explained in the previous subsection. That subsection also introduces variables in test reports.
In this subsection, you learn how you can read values from other reports. You will use the example adapter “adapterIngestMessage” to store a message in the database. The adapter returns a unique id that is needed to retrieve the message again. This time the id is not fake; the id is really different for each stored message. You will use another adapter “adapterGetIngestedMessage” to retrieve the message, the input being the id to search for. For each of these two adapters, you will capture a test report. You will update these test reports such that they cooperate. The test report of “adapterGetIngestedMessage” will access the test report of “adapterIngestMessage” to find the id to search for. This is a stronger test than you would have by hiding the id differences with ignores.
Get the raw test reports
Please do the following to get the raw test reports:
Preparing yourself is easy this time. You do not need test reports you captured in earlier sections. Please do the general preparations of this tutorial before proceeding, see Preparations.
Until now, you started the Frank!Runner with the command
start.bat. For this subsection, you need another command:start.bat -Djdbc.migrator.active=true. Please make sure you started the Frank!Runner with this last command.Please go to Testing | Test Pipeline. Select adapter “adapterIngestMessage”. In the Message field, please enter the following:
<message>
  <customer>Frank</customer>
  <subject>Frank!Framework</subject>
  <message>We are a great community</message>
</message>
Press “Send”. Please check that you have a green bar to the top with the word “success”.
Warning
If you have a green bar with the word “failure”, something went wrong! In that case, please go to Ladybug and study the test report resulting from this step. Then redo this step the correct way.
Below the “Send” button, you will see a result like the following:
<uuid>1921681780121591728046160836108</uuid>
Your result will have a different code. Please save your result and use it instead of the result presented here.
Select adapter “adapterGetIngestedMessage”. In the Message field, please put the output you saved in the previous step.
Press “Send”. Check that you have a green bar with the word “success” and that you have the following output:
<message><customer>Frank</customer><subject>Frank!Framework</subject><message>We are a great community</message></message>
This is the message you stored with all meaningless spaces omitted.
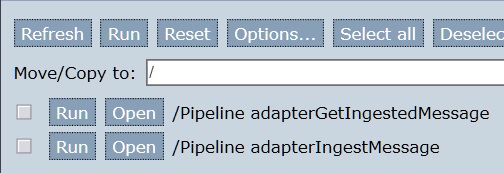
Please go to Testing | Ladybug and press Refresh. The test report table to the top should satisfy the following. The top row is about adapter “adapterGetIngestedMessage”, while the next row is about adapter “adapterIngestMessage”. To see this, you may have to sort by column “StorageId” or “EndTime”.
Copy these two test reports. IMPORTANT: Use stub strategy “Never”!
Warning
If you use stub strategy “Stub all senders”, your tests will be less powerfull. In this case, your captured test reports will not really access the database, output from the database being simulated by data within the captured test reports. We want to include real database access in our tests.
Go to tab “Test” and press “Refresh”. You should see the following:
Please download your test reports as explained in subsection Save and load captured test reports. If something goes wrong with editing, you can restore your raw test reports again.
Edit the test reports
You have captured the test reports you need, but you have to edit them before they work well. In step 10, you saw that “adapterGetIngestedMessage” comes before “adapterIngestMessage”. Ladybug sorts the test reports by name. The first edit you have to do is renaming your test reports. Please continue as follows:
Please press the “Open” button of the “adapterIngestMessage” test report. You enter a new tab.
In the left-hand tree view, select the topmost “adapterIngestMessage” node. Then press “Edit”.
You see the screen shown below. Please enter
00 Pipeline adapterIngestMessagein the name field. Then press “Save” and “Close” (not shown).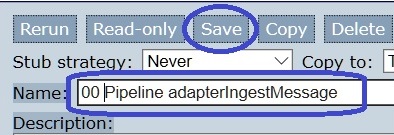
You return to the “Test” tab. Press “Refresh”. Now your screen should look like you see below:
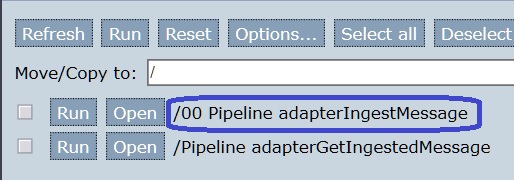
Now the sequence of the two test reports is right: “adapterIngestMessage” comes first. You may want to rename your “adapterGetIngestedMessage” as well to have similar names.
Within the “adapterGetIngestedMessage” test report, you are going to reference the “adapterIngestMessage” report. Within that test report there are different “checkpoints”, one being the input and one being the output. You will now lookup the checkpoint uid of the checkpoint you want to read from. Please do the following:
Press the “Open” button of the “adapterIngestMessage” test report.
Select the bottom “adapterIngestMessage” node, the one with the left-pointing arrow. See below:
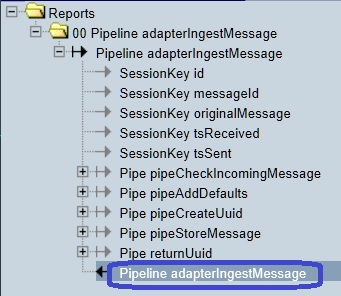
To the right, you see the checkpoint uid (number 2 in the figure below). In the figure, the shown value is
2#32, but when you do this tutorial you will probably have another value. Please save the checkpoint uid for later use.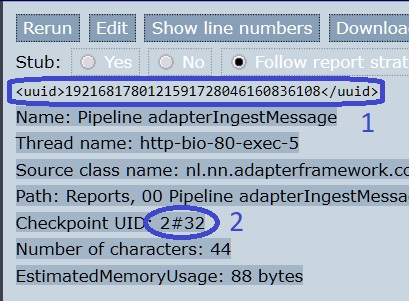
You also see the expected output captured in the test report (number 1). You will need an XPath expression to read the code. The code is wrapped in a
<uuid>XML element.
To read a value from another test report, you use the ${ } syntax you saw earlier for referencing variables. Inside these braces, you do not put a name this time, but you fill in the blanks in the following expressing: ${checkpoint(__).xpath(__)}.
Our aim is to get the code within the <uuid> XML element. To do this, you need the XPath expression /uuid. Combined with the checkpoint you found earlier, the expression you need becomes ${checkpoint(2#32).xpath(/uuid)} (in which your checkpoint string is probably different). Please remember this report refencing expression and continue as follows:
Please press the “Open” button of test report “adapterGetIngestedMessage”. Select the second “adapterGetIngestedMessage” node in the tree view to the left. Press “Edit”.
Edit the text field to hold the report referencing expression you remembered before step 20. This expression represents the code only; you still need to wrap it inside a
<uuid>XML element. See the figure below:
Warning
You can only reference values that appear inside an XML element. If adapter “adapterIngestMessage” would return the id without wrapping it inside an XML element, you would not be able to read it.
Press “Save”, then “Close”. You return to the “Test” tab.
Finally, you need to edit the “adapterGetIngestedMessage” test report. This test report will return a different document id each time it is executed, so we need an ignore. Please continue as follows:
Go to tab “Debug”. Press “Options”, then “Transformation”.
Copy the XSLT transform you see to the clipboard. Then close the two dialogs.
Return to tab “Test”. Press the “Open” button of test report “adapterIngestMessage”.
To the left, select the topmost “adapterIngestMessage” node. Then press “Edit”.
To the right, paste inside the “Transformation” field.
Search for the string
Ignore content of timestamp element.Edit the text below this string to become:
<xsl:template match="uuid"><UUID-IGNORED/></xsl:template>
Press “Save”, then “Close”. You return to tab “Test”.
Run your two test reports. They should both succeed now.
Press the “Compare” button of the “adapterIngestMessage” test report.
Check that you see the string
<UUID-IGNORED>. If you see this, your ignore is doing what you intend it to do.
Final checks
Everything seems all right now. It is very tempting to stop thinking when you see green checkmarks and to assume everything is right. It is wise however to think twice: “Can the tests succeed when in fact there are still issues?”. Your test stores a message in the database and retrieves another message, and the adapters doing this do not produce errors. To be really sure everything is right, you should test that you are reading the message you intend to read, not some old message. Please continue as follows:
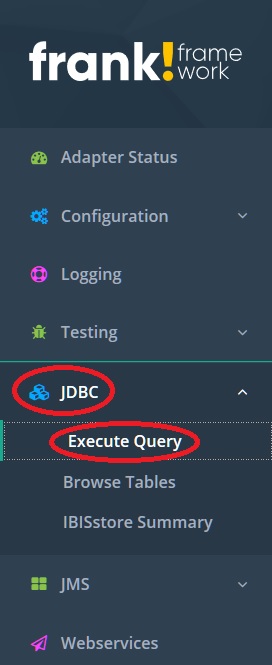
In the main menu, select “JDBC”. This item will expand. Then select “Execute Query” as shown below.
Execute the query
delete from messageto remove all messages you stored with “adapterIngestMessage”. Enter that query in the Query field (number 1 in the figure below). Press “Send” (number 2) and check for success (number 3).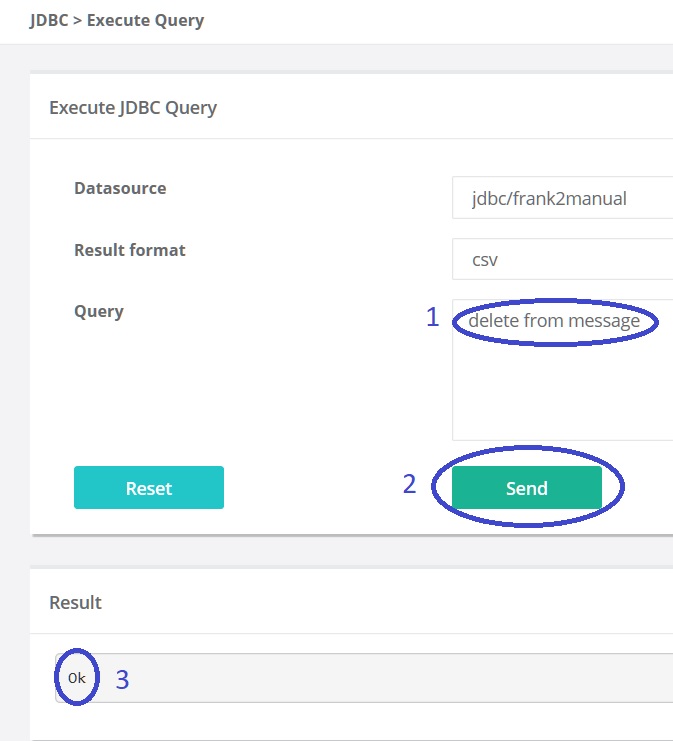
Return to Ladybug, tab “Test”. Execute your two test reports. Check that they still succeed.
When you are here, you have verified the following. Running your captured “adapterGetIngestedMessage” adapter reads another message than you read with your manual run of “adapterGetIngestedMessage”. There is one final check you can do:
Run your test reports a second time. They should still be green.
Go to tab “Debug” and press “Refresh”. In the table of your test reports, please verify that you see the following (when you sort by end time in descending order):
To the top, one execution of “adapterGetIngestedMessage”.
Below this, another execution of this adapter.
Further down, an execution of “Sender QuerySender”. This row reflects that you executed query “delete from message”.
You have verified that you executed both test reports two times after deleting all stored messages.
For both rows of “adapterGetIngestedMessage”, select the node shown below. After selecting the node, look at the input message, something like
<uuid>1921681780121591783348250481958</uuid>. Check that the input message is different for the two rows you consider.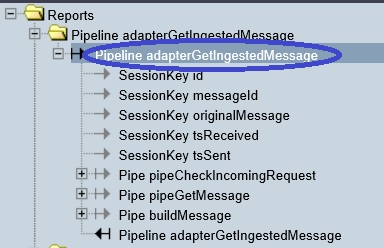
You have verified that each run of your tests reads a message with a different id. Now you can be satisfied that your tests do what you intend them to do.