Capture test reports
In the preceeding subsections, two ways were demonstrated to access the simplified electronic archive introduced in Introduction. In subsection Use web interface, the HTTP interface of the System Under Test was accessed. In Use test pipeline, the HTTP interface was bypassed such that the input message was given directly to the business logic. We saw reports of these actions in Ladybug. In this subsection, we capture these reports and demonstrate how they can be run again. In subsection Edit test reports, you will change captured test reports.
Please do the following:
Ensure that the Frank!Framework is set up according to Preparations and that it is running. Go to Ladybug. Ensure that the report generator is enabled. See Windows or Linux.
Ensure that you have a report in Ladybug for running adapter “sutGet”. If it misses, repeat the steps of Use test pipeline.
Select the line corresponding to the execution of “sutGet”. This is shown with number 1 in the picture below:
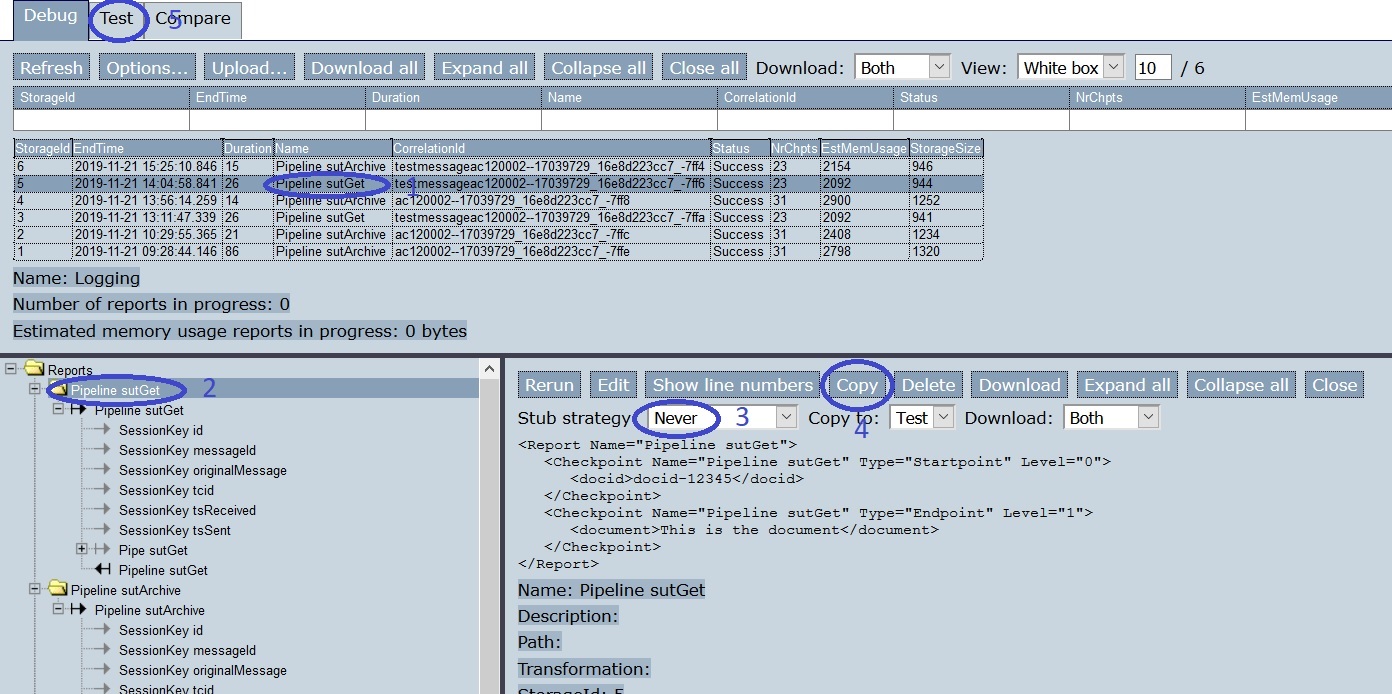
Select the upper-most “Pipeline” node (number 2).
Select stub strategy “Never” in the pull down menu with number 3.
Press “Copy” (number 4).
Go to tab “Test” (number 5). This changes the screen as shown:

You see you are in tab “Test” (number 1). Press “Refresh” (number 2). This causes your captured test reports to appear (number 3).
Select your test (number 4).
Run your test by pressing “Run” (number 6). The other “Run” (button 5) can be used to run individual tests.
Press “Refresh”. A message appears showing that the test succeeded (number 1 in the figure below):

Go back to tab “Debug”, number 1 in the figure below. Press “Refresh” (number 2).
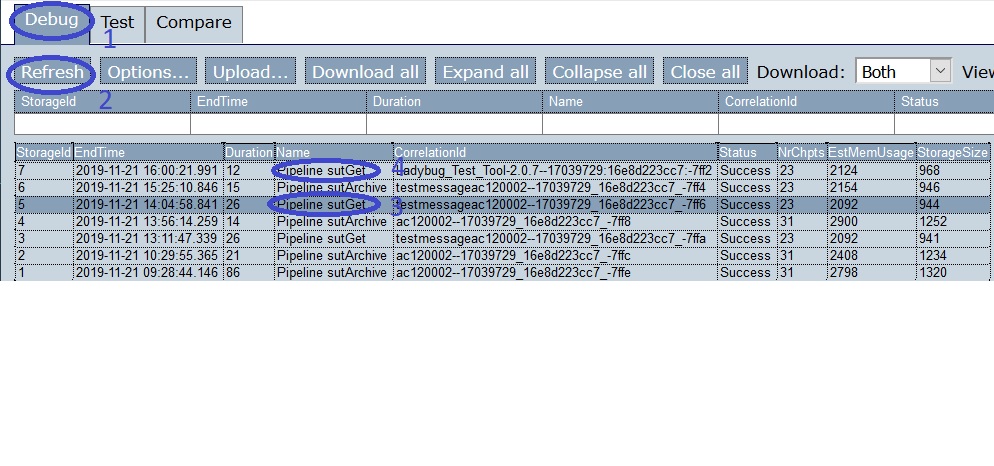
Numbers 3 and 4 show the impact of running a captured test. Number 3 was the run of “sutGet” that was captured. Number 4 was introduced by running the captured test. Every execution of an adapter results in a table row.
Note
Frank developers may be interested in the following. When you use the Frank!Runner, then the test reports you have in tab “Test” are stored within your instance directory. In this example, the directory is Frank2Manual/tests. When you have another instance directory, then your test reports are stored in subdirectory tests of that instance directory. You can save your test reports by copying them from directory tests to some other directory. You can restore the test reports by putting the files back.
If you need a different directory for storing your Ladybug test reports, you can configure it by setting property ibistesttool.directory. When you set this property, the directory of Larva is not modified; you get separate directories for Ladybug and Larva by setting this property.
By default, the directory of stored Ladybug test reports is shared with Larva tests. You need to distinguish Larva files from Ladybug files, because you have to keep your Ladybug files together. You can recognize your Ladybug test report files as follows:
metadata.xmlis part of your Ladybug test reports.Every file ending with
.report.xmlbelongs to the Ladybug test reports.All other files in directory
testsare not related to Ladybug.
Saving and loading test reports can also be achieved by downloading and uploading test reports as will be explained in subsection Save and load captured test reports. Please do not skip that subsection, because the user interface explained there will also work when you do not use the Frank!Runner. The Frank!Runner is not intended to be used in your production environment.
The advantage of using the tests directory is as follows. The Ladybug test reports in directory tests are text files, allowing them to be analyzed by version control software. Frank developers can thus capture test reports during development, and they can include these test reports in their release to the customer.